Setup of Bookie Oracle Suite
This article explains how the Bookie Oracle Suite (BOS) is installed, tested and maintained. We start with installation and step-wise testing and then go over to installing BOS-MINT (Manual intervention module) and also show how to use the command line tool for inspections.
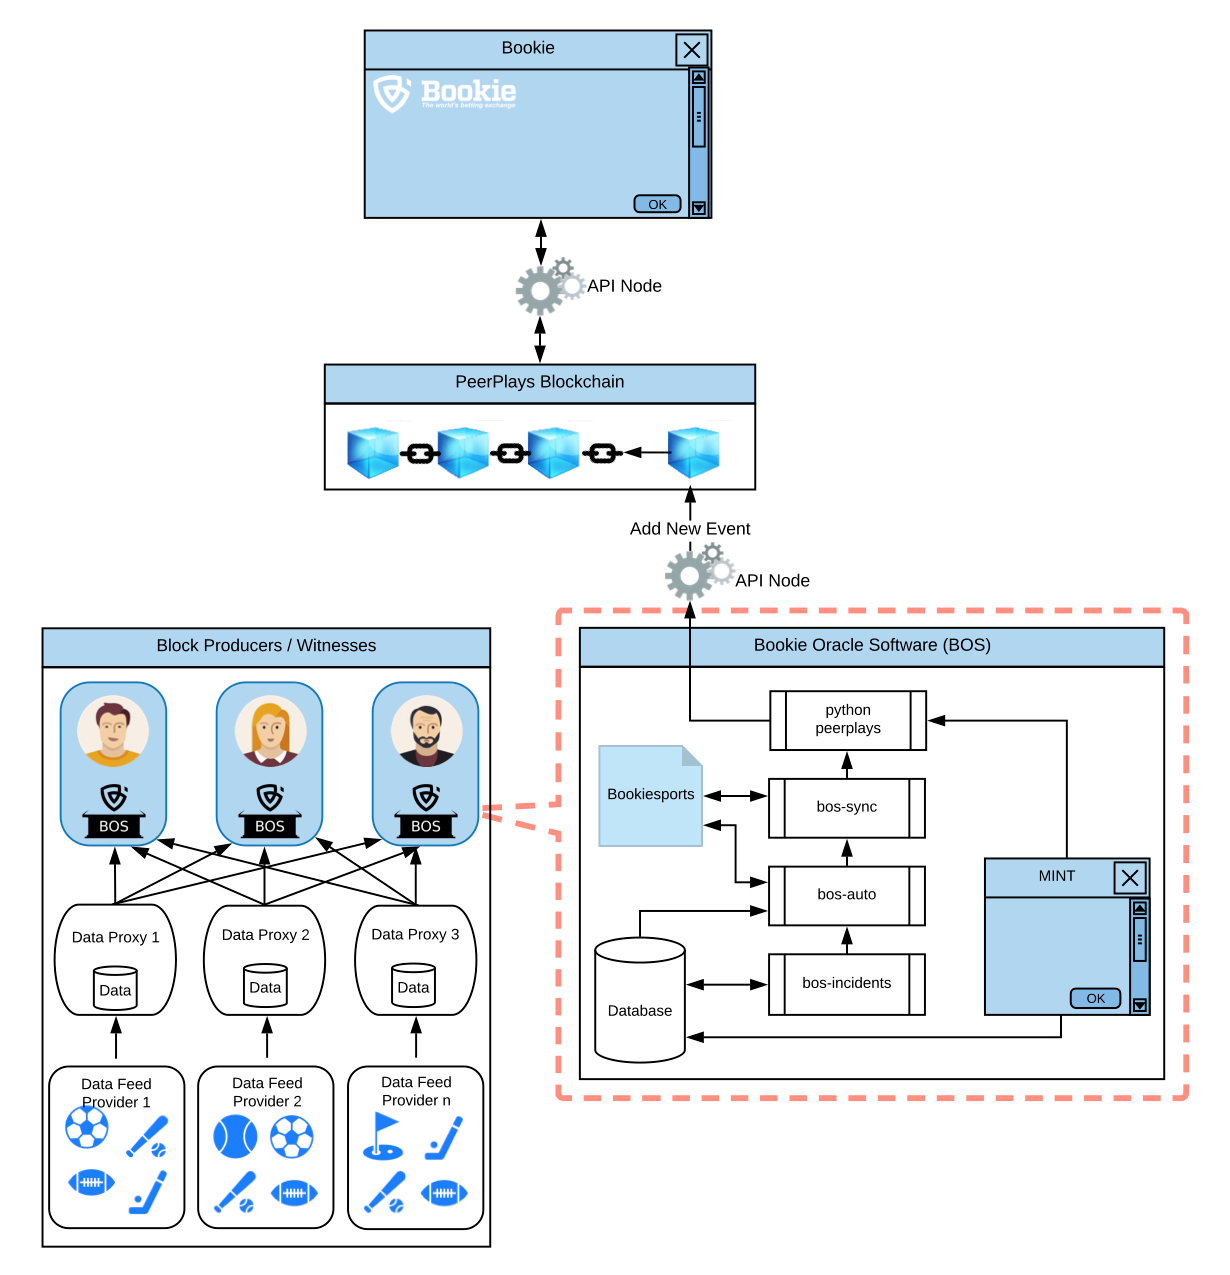
Overall Structure
Installation of bos-auto
In this step, we install everything we will need going forward.
Install dependencies (as root/sudo)
apt-get install libffi-dev libssl-dev python-dev python3-dev python3-pip libsecp256k1-dev
pip3 install virtualenv
Note that virtualenv is a best practice for python, but installation can also be on a user/global level.
Install databases (as root/sudo)
Within BOS, redis is used as an async queue for the python processes, whereas MondoDB is used as the persistent storage.
- mongodb - interaction between BOS-auto and MINT. Please find tutorials on how to install mongodb on your distribution. Make sure that the MongoDB is running reliable with automatic restart on failure.
- redis - worker queue. Please find instructions to install redisdb on your Linux distribution. Make sure that RedisDB is running reliable with automatic restart on failure. Furthermore, Redis should run without any disk persistance.
For Ubuntu 16.04. installation for mongodb is
apt-get install mongodb
and for redis
apt-get install build-essential
apt-get install redis-server
It is highly recommended to ensure that both daemons are started on powerup, e.g.
systemctl enable mongod
systemctl enable redis
To start the deamons, execute
systemctl start mongod
systemctl start redis
Common issues
- Exception that contains Can’t save in background: fork or MISCONF Redis is configured to save RDB snapshots. This indicates that either your queue is very full and the RAM is insufficient, or that your disk is full and the snapshot can’t be persisted. Create your own Redis configuration file (https://redis.io/topics/config) and use it to deactivate caching and activate overcommit memory, e.g. as shown here
- Exception that contains IncidentStorageLostException: localhost:27017: [Errno 111] Connection refused or similar. This indicates that your MondoDB is not running properly.
Install bos-auto (as user)
You can either install bos-auto via pypi / pip3 (production installation) or via git clone (debug installation). For production use install bos-auto via pip3 is recommended, but the git master branch is always the latest release as well, making both installations equivalent. Suggested is a seperate user
cd ~
mkdir bos-auto
cd bos-auto
# create virtual environment
virtualenv -p python3 env
# activate environment
source env/bin/activate
# install bos-auto into virtual environment
pip3 install bos-auto
For debug use, checkout from github (master branch) and install dependencies manually
cd ~
# checkout from github
git clone https://github.com/pbsa/bos-auto
cd bos-auto
# create virtual environment
virtualenv -p python3 env
# activate environment
source env/bin/activate
# install dependencies
pip3 install -r requirements.txt
BOS auto is supposed to run in the virtual environment. Either activate it beforehand like shown above or run it directly in the env/bin folder.
Upgrading bos-auto (as user)
For production installation, upgrade to the latest version - including all dependencies - via
pip3 install --upgrade --upgrade-strategy eager bos-auto
For debug installation, pull latest master branch and upgrade dependencies manually
git pull
pip3 install -r requirements.txt --upgrade --upgrade-strategy eager
Configuration of bos-auto
We now proceed with the steps required to setup bos-auto properly.
Warning
At this point is is crucial to set the default witness node to
your own server (ideally running in localhost, see below config.yaml) using peerplays set node
ws://ip:port. If this step is skip, the setup will not work or work
with very high latency at best.
Setup your python-peerplays wallet
# you will be asked to provide a new wallet passphrase. Later in the
# tutorial you will be asked to store that password in a file
# (config.yaml)
peerplays createwallet

# to add the key we need to make the node known (preferably on localhost)
peerplays set node ws://localhost:8090

peerplays addkey
# You will be prompted to enter your active private key for the witness
Funding the account
Since your witness account is going to create and approve proposals automatically, you need to ensure that the witness account is funded with PPY.
Modify configuration
We now need to configure bos-auto.
wget https://raw.githubusercontent.com/PBSA/bos-auto/master/config-example.yaml
mv config-example.yaml config.yaml
# modify config.yaml
The variables are described below:
# Please see bos_auto/config-defaults.yaml for description

node: ws://localhost:8090

network: beatrice

redis_password: <your redis password>

passphrase: <your python peerplays wallet password>

BOOKIE_PROPOSER: <your witness account name>

BOOKIE_APPROVER: <your witness account name>
Spinning up bos-auto
In the following, we are spinning up bos-auto and see if it works properly. To do so, we need to start two processes:
- An endpoint that takes incident reports from the data proxy and stores them in mongodb as well as issues work for the worker via redis.
- The worker then takes those incidents and processes those.
It is recommended to run both via system services.
The commands shown are for production installation, for debug installation replace “bos-auto” with “python3 cli.py”.
Note:
- Former installations also required to run the scheduler as a separate process. This is no longer necessary, it is spawned as a subprocess.
Start the Endpoint
This is a basic setup and uses the flask built-in development server, see Production deployment below.
cd bos-auto
bos-auto api --host 0.0.0.0 --port 8010       [--help for more information]
After this, you will see the following messages if correctly set up:
INFO | Opening Redis connection (redis://localhost/6379) * Running on http://0.0.0.0:8010/ (Press CTRL+C to quit)
This means that you can send incidents to http://0.0.0.0:8010/.
Testing
You can test that the endpoint is properly running by:
curl http://localhost:8010
In that case, the api daemon should print the following line:
127.0.0.1 - - [26/Apr/2018 14:19:45] "GET / HTTP/1.1" 404 -
At this point, we are done with setting up the endpoint and can go further setting up the actual worker.
Delivery to Data Proxies
Data proxies are interested in this particular endpoint as they will push incidents to it. This means that you need to provide them with your ip address as well as the port that you have opened above.
Monitoring
The endpoint has an isalive call that should be used for monitoring:
curl http://localhost:8010/isalive
which produces an output like:
{
   "background": {
      "scheduler": True
   },
   "queue": {
      "status": {
         "default": {
            "count": 1
         },
         "failed": {
            "count": 0
         }
      }
   },
   "versions": {
      "bookiesports": "0.2.6",
      "bos-auto": "0.1.10",
      "bos-incidents": "0.1.5",
      "bos-sync": "0.1.8",
      "peerplays": "0.1.32"
   }
}
Interesting are here the listed versions and queue.status.default.count. The count should be 0 most of the times, it reflects how many unhandled incidents are currently in the cache.
Production deployment
Going into production mode, a witness may want to deploy the endpoint via UWSGI,
create a local socket and hide it behind an SSL supported nginx that deals with a simple domain
instead of ip:port pair, like https://dataproxy.mywitness.com/trigger.
Start worker
Warning
At this point is is cruciual to set the default witness node to
your own server (ideally running in localhost) using peerplays set node
ws://ip:port. If this step is skip, the setup will not work or work
with very high latency at best.
We start the worker with:
cd bos-auto
bos-auto worker      [--help for more information]
It will already try to use the provided password to unlock the wallet and, if successfull, present the following text to you:
INFO     | Opening Redis connection (redis://localhost/6379)
unlocking wallet ...
14:21:53 RQ worker 'rq:worker:YOURHOSTNAME.554' started, version 0.9.2
14:21:53 Cleaning registries for queue: default
14:21:53
14:21:53 *** Listening on default...
Nothing else needs to be done at this point
Testing
Warning
For testing, we highly recommend that you set the
nobroadcast flag in config.yaml to True!
For testing, we need do actually throw a properly formated incident at the endpoint. To simplify this for witnesses, you can take the following ones:
{'provider_info': {'pushed': '2018-03-10T00:06:23Z', 'name': '5e2cdc120c9404f2609936aa3a8d49e4'}, 'call': 'create', 'timestamp': '2018-04-25T10:54:10.495868Z', 'arguments': {'unsure': True, 'season': '2018'}, 'unique_string': '2018-03-16t230000z-ice-hockey-nhl-regular-season-washington-capitals-new-york-islanders-create-2018-true', 'id': {'away': 'New York Islanders', 'event_group_name': 'NHL Regular Season', 'start_time': '2018-03-16T23:00:00Z', 'home': 'Washington Capitals', 'sport': 'Ice Hockey'}}
{'provider_info': {'pushed': '2018-03-10T00:06:23Z', 'name': '5e2cdc1safasf4f2609936aa3a8d49e4'}, 'call': 'create', 'timestamp': '2018-04-25T10:54:10.495868Z', 'arguments': {'unsure': True, 'season': '2018'}, 'unique_string': '2018-03-16t230000z-ice-hockey-nhl-regular-season-washington-capitals-new-york-islanders-create-2018-true', 'id': {'away': 'New York Islanders', 'event_group_name': 'NHL Regular Season', 'start_time': '2018-03-16T23:00:00Z', 'home': 'Washington Capitals', 'sport': 'Ice Hockey'}}
store this in a file called replay.txt and run the following call:
bos-auto replay --url http://localhost:8010/trigger replay.txt
Note
Please note the trigger at the end of the endpoint URL.
This will show you the incident and a load indicator at 100% once the incident has been successfully sent to the endpoint.
This should cause your endpoint to print the following:
INFO     | Forwarded incident create to worker via redis
127.0.0.1 - - [26/Apr/2018 14:25:43] "POST /trigger HTTP/1.1" 200 -
and your worker to print something along the lines of (once for each incident above):
14:23:38 default: bookied.work.process({'provider_info': {'pushed': '2018-03-10T00:06:23Z', 'name': '5e2cdc120c9404f2609936aa3a8d49e4'}, 'call': 'create', 'timestamp': '2018-04-25T10:54:10.495868Z', 'arguments': {'unsure': True, 'season': '2018'}, 'unique_string': '2018-03-16t230000z-ice-hockey-nhl-regular-season-washington-capitals-new-york-islanders-create-2018-true', 'id': {'away': 'New York Islanders', 'event_group_name': 'NHL Regular Season', 'start_time': '2018-03-16T23:00:00Z', 'home': 'Washington Capitals', 'sport': 'Ice Hockey'}, 'approver': 'init0', 'proposer': 'init0'}, approver=None, proposer=None) (a2f4eaaf-e750-4934-8c73-5481fe32df94)
  INFO     | processing create call with args {'unsure': True, 'season': '2018'}
  INFO     | Creating a new event ...
  INFO     | Creating event with teams ['Washington Capitals', 'New York Islanders'] in group NHL Regular Season.
  INFO     | Object "NHL Regular Season/Washington Capitals/New York Islanders" has pending update proposal. Approving {'pid': '1.10.413', 'oid': 0, 'proposal': <Proposal 1.10.413>}
  INFO     | Approval Map: {'1.10.224': '0.0', '1.10.413': '25.0', '1.10.414': '0.0', '1.10.416': '0.0'}
  INFO     | Object "New York Islanders @ Washington Capitals/Moneyline" has pending update proposal. Approving {'pid': '1.10.413', 'oid': 1, 'proposal': <Proposal 1.10.413>}
  INFO     | Approval Map: {'1.10.224': '0.0', '1.10.413': '50.0', '1.10.414': '0.0', '1.10.416': '0.0'}
  INFO     | Updating Betting Markets ...
  INFO     | Updating Betting Market New York Islanders ...
  INFO     | Object "Moneyline/New York Islanders" has pending update proposal. Approving {'pid': '1.10.413', 'oid': 2, 'proposal': <Proposal 1.10.413>}
  INFO     | Approval Map: {'1.10.224': '0.0', '1.10.413': '75.0', '1.10.414': '0.0', '1.10.416': '0.0'}
  INFO     | Updating Betting Market Washington Capitals ...
  INFO     | Object "Moneyline/Washington Capitals" has pending update proposal. Approving {'pid': '1.10.413', 'oid': 3, 'proposal': <Proposal 1.10.413>}
  INFO     | Approval Map: {'1.10.224': '0.0', '1.10.413': '100.0', '1.10.414': '0.0', '1.10.416': '0.0'}
  INFO     | Proposal 1.10.413 has already been approved by init0
  INFO     | Skipping dynamic BMG: New York Islanders @ Washington Capitals/Handicap
  INFO     | Skipping dynamic BMG: New York Islanders @ Washington Capitals/Over/Under {OU} pts
14:23:45 default: Job OK (a2f4eaaf-e750-4934-8c73-5481fe32df94)
14:23:45 Result is kept for 500 seconds
14:23:45
14:23:45 *** Listening on default...
14:23:45 default: bookied.work.approve(approver=None, proposer=None) (cb914014-3bc1-4db7-b684-723826ce3c09)
  INFO     | Testing for pending proposals created by init0 that we could approve by init0
14:23:45 default: Job OK (cb914014-3bc1-4db7-b684-723826ce3c09)
14:23:45 Result is kept for 500 seconds
14:23:45
Note
Each incident results in two work items, namely a
bookied.work.process() as well as a
bookied.work.approve() call. The former does the heavy
lifting and may produce a proposal, while the latter approves
proposals that we have created on our own.
Command Line Intervention
With the command line tool, we can connect to the mongodb and inspect the incidents that we have inserted above:
bos-auto incidents list
The output should look like:
+------------------------------+-----------------------------------------------------------------------------------------------------------------------------------------------------------------------+
| identifier                   | Incidents                                                                                                                                                             |
+------------------------------+-----------------------------------------------------------------------------------------------------------------------------------------------------------------------+
| Ice Hockey                   | +--------+------------+----------------------------------------------------------------------------------------------------------+----------------------------------+ |
| NHL Regular Season           | | call   | status     | incident uid                                                                                             | incident provider                | |
| 2018-03-16T23:00:00Z         | +--------+------------+----------------------------------------------------------------------------------------------------------+----------------------------------+ |
| home: Washington Capitals    | | create | name: done | 2018-03-16t230000z-ice-hockey-nhl-regular-season-washington-capitals-new-york-islanders-create-2018-true | 5e2cdc117c9404f2609936aa3a8d49e4 | |
| away: New York Islanders     | |        |            | 2018-03-16t230000z-ice-hockey-nhl-regular-season-washington-capitals-new-york-islanders-create-2018-true | 5e2cdc120c9404f2609936aa3a8d49e4 | |
|                              | +--------+------------+----------------------------------------------------------------------------------------------------------+----------------------------------+ |
+------------------------------+-----------------------------------------------------------------------------------------------------------------------------------------------------------------------+
It tells you that two incidents for that particular match came in that both proposed to create the incident. The status tells us that the incidents have been processed.
We can now read the actual incidents with:
bos-auto incidents show 2018-03-16t230000z-ice-hockey-nhl-regular-season-washington-capitals-new-york-islanders-create-2018-true 5e2cdc117c9404f2609936aa3a8d49e4
and replay any of the two incidents by using:
bos-auto incidents resend 2018-03-16t230000z-ice-hockey-nhl-regular-season-washington-capitals-new-york-islanders-create-2018-true 5e2cdc117c9404f2609936aa3a8d49e4
This should again cause your worker to start working.
Manual Intervention
Bos-mint is a web-based manual intervention module that allows you to do with all sorts of manual interactions with the blockchain. It comes with it’s own documentation at: http://bos-mint.readthedocs.io/
Monitoring bos-auto
The isalive call should be used for monitoring. The scheduler must be running, and the default queue a low count (< 10).
Here is an example of a positive isalive check:
 {
   "background": {
      "scheduler": True
   },
   "queue": {
      "status": {
         "default": {
            "count": 0
         },
         ...
      }
   },
   ...
}